Enlightenment
Untying
Page
2 - More on home food growing and permaculture
What is Permaculture?
Permaculture (permanent
agriculture) is the conscious design and maintenance
of agriculturally productive ecosystems which have
the diversity, stability, and resilience of natural
ecosystems. It is the harmonious integration of
landscape and people providing their food, energy,
shelter, and other material and non-material needs
in a sustainable way. Without permanent agriculture
there is no possibility of a stable social order.
Permaculture
design is a system of assembling conceptual,
material, and strategic components in a pattern
which functions to benefit life in all its forms.
The
philosophy behind permaculture is one of working
with, rather than against, nature; of protracted and
thoughtful observation rather than protracted and
thoughtless action; of looking at systems in all
their functions, rather than asking only one yield
of them; and allowing systems to demonstrate their
own evolutions.
Permaculture
in Landscape and Society
As
the basis of permaculture is beneficial design, it
can be added to all other ethical training and
skills, and has the potential of taking a place in
all human endeavors. In the broad landscape,
however, permaculture concentrates on
already-settled areas and agricultural lands. Almost
all of these need drastic rehabilitation and
re-thinking. One certain result of using our skills
to integrate food supply and settlement, to catch
water from our roof areas, and to place nearby a
zone of fuel forest which receives wastes and
supplies energy, will be to free most of the area of
the globe for the rehabilitation of natural systems.
These need never be looked upon as “of use to
people”, except in the very broad sense of global
health.
The
real difference between a cultivated (designed)
ecosystem, and a natural system is that the great
majority of species (and biomass) in the cultivated
ecology is intended for the use of humans or their
livestock. We are only a small part of the total
primeval or natural species assembly, and only a
small part of its yields are directly available to
us. But in our own gardens, almost every plant is
selected to provide or support some direct yield for
people. Household design relates principally to the
needs of people; it is thus human-centered
(anthropocentric).
This
is a valid aim for settlement design, but we also
need a nature-centered ethic for wilderness
conservation. We cannot, however, do much for nature
if we do not govern our greed, and if we do not
supply our needs from our existing settlements. If
we can achieve this aim, we can withdraw from much
of the agricultural landscape, and allow natural
systems to flourish.
Recycling
of nutrients and energy in nature is a function of
many species. In our gardens, it is our own
responsibility to return wastes (via compost or
mulch) to the soil and plants. We actively create
soil in our gardens, whereas in nature many other
species carry out that function. Around our homes we
can catch water for garden use, but we rely on
natural forested landscapes to provide the condenser
leaves and clouds to keep rivers running with clean
water, to maintain the global atmosphere, and to
lock up our gaseous pollutants. Thus, even
anthropocentric people would be well-advised to pay
close attention to, and to assist in, conservation
of existing forests and to assist in, the
conservation of all existing species and allow them
a place to live.
We
have abused the land and laid waste to systems we
never need have disturbed had we attended to our
home gardens and settlements. If we need to state a
set of ethics on natural systems, then let it be
thus:
-
Implacable and
uncompromising opposition to further disturbance
of any remaining natural forests, where most
species are still in balance;
-
Vigorous
rehabilitation of degraded and damaged natural
systems to stable states;
-
Establishment
of plant systems for our own use on the least
amount of land we can use for our existence; and
-
Establishment
of plant and animal refuges for rare or
threatened species.
Permaculture
as a design system deals primarily with the third
statement above, but all people who act responsibly
in fact subscribe to the first and second
statements. We believe we should use all the species
we need or can find in our own settlement designs,
providing they are not locally rampant and invasive.
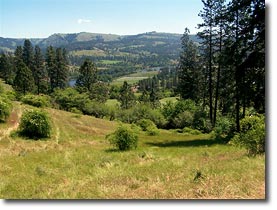
It
has been nearly three years since my husband Kim and
I decided we wanted to find a piece of land
somewhere where we could raise most of our own food
and lead a healthier, more sustainable lifestyle. By
March of 2007, we were the proud new owners of a
beautiful farm just under 44 acres in North Central
Idaho.
Now
what?
We
knew we wanted to raise fruits and vegetables and
medicinal herbs without chemicals so organic farming
interested us. We also wanted to build a straw bale
house and raise our own livestock for meat, eggs and
dairy. We started researching different methods and
one day an article in Mother Earth News magazine
changed everything. The name of the article was,
“Plant an Edible Forest Garden” by Harvey Ursery.
The article started out by asking questions. “Are
you feeling adventurous?” Sure! “Do you want to
delve deeper into gardening?” Why, yes. Even better,
"are you thinking of planting an orchard?” Wow, this
guy must be psychic… how did he know? It went on,
"If so, consider planting a forest garden….”
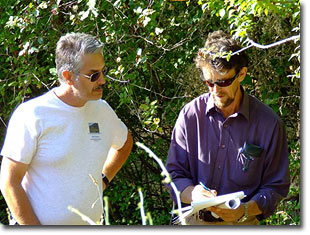
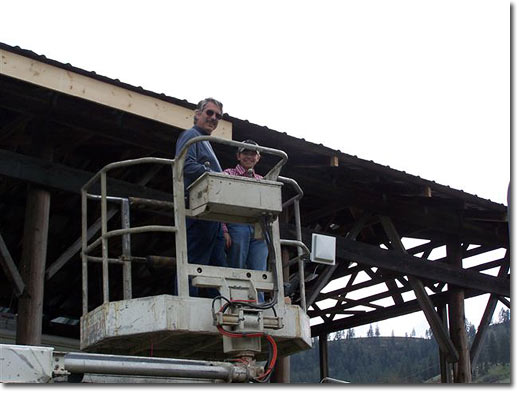
Kim Pagliaro and Geoff Lawton
Discussing Our Design |
The
idea of working with nature and imitating natural
systems clicked with us. It made perfect sense. I
thought we had better find out more about this
Permaculture stuff! Within a short period of time, I
knew quite a bit about the history of Permaculture
and the credentials of Bill Mollison and Geoff
Lawton. I signed up for a Permaculture webinar
offered by Midwest Permaculture in the States and
shared what I had learned with my husband. The next
logical step was to take a Permaculture Design
Course, but which one and where? And then… I found
it… the Tagari website! Bill Mollison was still
teaching Permaculture and there was a PDC scheduled
in three months in Melbourne, Australia! I told Kim,
“Did you know Bill Mollison and Geoff Lawton are
teaching a PDC in Australia in January? It sure
would be fantastic to learn from one of the most
experienced teachers ever, not to mention the man
that started it all, wouldn’t it?” I think he
muttered back, “Yeah, sure…we’ve always wanted to go
to Australia”. At this point it was more of a joke
then a plan but I couldn’t resist checking the
airfare prices. We had saved some money to dig a
well on the farm, but perhaps this was more
important. To make a long story short, three months
later, my husband and I, and our daughter, Kelly,
found ourselves on a plane to Melbourne.
It
is no exaggeration that a Permaculture design
certificate course is a life changing experience.
While not all Permaculture students go on to teach,
we were sure before the end of our PDC, that
establishing a demonstration farm and educational
center on our farm in Idaho was what we wanted to do
with the rest of our lives. As an added bonus, our
then eleven-year-old daughter Kelly, who just came
along for the ride, ended up with a Permaculture
Design certification as well.
Immediately
after returning to Las Vegas from Melbourne, the
three of us planted a Permaculture garden using
raised beds We also set up a website (www.kamiahpermaculture.com)
and organized an Introduction to Permaculture class
the following month. We went on to host three
different Permaculture Film and Discussion events at
the Las Vegas Springs Preserve featuring Bill
Mollison’s The Global Gardener and Geoff Lawton’s
water harvesting and food forest videos. Last
August, we were lucky to have Geoff and Nadia Lawton
visit our farm to consult on our design and we held
a small meeting in the town of Kamiah to introduce
some like-minded members of the local community to
the Lawtons.
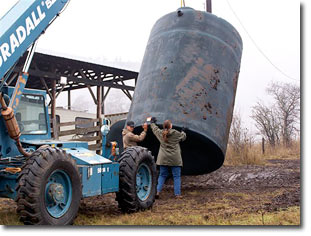
Setting up rainwater harvesting system
Returning
to our regular jobs seemed somewhat strange. Our
outlook on life had changed. I felt as if there was
something more important I should be doing. We knew
we would eventually make the move to Idaho full time
but the idea of leaving the security of a good
paying occupation was very terrifying. We continued
to prepare for our eventual relocation. We stopped
leasing our land to a cattle farmer, who has
obviously never heard of rotational grazing, and
attempted digging our first swale. Last fall, we set
up our rainwater harvesting system by installing
gutters on our barn roof (our only existing
structure which happily sits on the highest point on
our farm).
The
global economic situation put us at a crossroads. It
was time to choose…stay in our current situation of
a mainstream family always trying to make ends meet
and accumulate more stuff but never feeling
fulfilled and put our demonstration farm plans on
hold, or take the leap and have faith that by doing
something meaningful, things would fall into place
and everything would work out. Why couldn’t we have
thought of this when we were in our twenties? I have
to say this has been the biggest challenge our
family has ever faced… to make that decision to move
forward. We have decided to take the leap. To say we
are going to experience a lifestyle change is an
understatement. We purchased a yurt to live in until
we can build a straw bale house and started a small
sheet mulch garden. We do not have a well or
municipal source of water, only rainwater. Some
people think we are a little crazy.
Now
we are offering our first Permaculture classes at
our farm this summer with the help of experienced
Permaculture designers/teachers. In August, we are
offering a Permaculture Design Certificate course
with Jesse Lemieux of Pacific Permaculture, British
Columbia, Canada on August 23rd – September 4th,
followed by Water For Every Farm, a three-day
earthworks course, Sept. 5-7th, 2009, taught by
Warren Brush of Quail Springs Permaculture located
at Quail Springs in California.
We
are as excited about this change for our family as
we are scared but we are also optimistic.
Permaculture has given us hope for the future, our
future…everyone’s future. The world needs
Permaculture now. To share it with others has never
felt so right.
Storm water
and grey water preservation and distribution
by Cam Wilson, Forest Edge
Permaculture
Greywater
mulch-pits provide an excellent solution when
re-using greywater on your garden - they are cheap
to construct, they improve the quality of water
entering your soil and after some time provide you
with valuable compost. They’re very easy to
construct too. You basically just dig a hole, wack
in some 100mm ag-pipe and then fill it up with nice
chunky mulch.
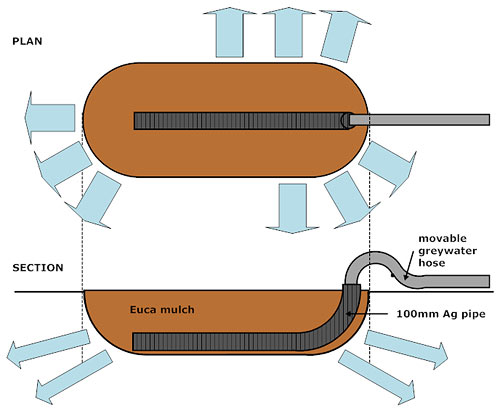
Where
possible a number of pits should be constructed
around the garden. This enables you to rotate your
greywater around and prevent the inevitable
waterlogging that occurs if you leave your hose in
one spot too long. For flat ground it’s great to
create round pits, with each one midway between a
few fruit trees. If on a slope, they will be on
contour and can double as a swale.
The
volume of each pit should be about 4 times the peak
flow that leaves your house at any one time. For
example if your washing machine pumps out 100
litres, the size of the hole needs to be 400litres
(as a guide, 1m3 = 1,000litres). This is to allow
for the space taken up by the woody mulch (about 2/3
of the volume) plus a bit extra. 40 cm is plenty
deep enough, or else you’ll start to send most of
the water down below the main feeder/drinker roots
of your trees.
If
you have very sandy soils in which most water just
disappears straight down, it can pay to line the
inside of your pit with plastic. A few punctured
holes here and there allow you to infiltrate the
water in the direction(s) of your choice. It also
gives the critters more time to clean up the water.
With
the huge increase in the use of greywater on
Australian gardens, particularly here in Victoria
where we’ve been on restrictions for a number of
years now, there is concern about the effect it will
have on soils in the long term. Even if using liquid
detergents, which are much lower in sodium and
phosphorus than powders (see lanfaxlabs for
more info), the alkaline nature of soaps will affect
soil pH. Fats and oils from our bodies can also clog
up soil pores and make them hydrophobic and any
bleaches or harsh cleaners will of course have a
huge impact on soil life.
By
filling these pits with chunky mulch, this acts to
filter and clean the water, resulting in better
quality irrigation for your valuable fruit trees.
It’s not the mulch that does the filtering but
rather the tiny soil critters that will colonise its
surface and just like in a reedbed system, they
greedily grab onto any nutrient that passes by.
Inevitably, this mulch will be broken down into
compost, at which time you should say “Awesome!” and
fork it out of your pit straight onto the fruit
trees beside. Then, give your local tree lopper a
call and get a free/very cheap load of mulch
delivered and refill them. (By the way, this is so
much easier than cleaning out a clogged up reedbed,
plus you get the compost out of it instead of a mess
of aggregate you don’t know what to do with.)
The
simplest way to get water to each pit is by
extending the washing machine outlet hose. You can
rotate this hose once a week or so. A few tips to
prevent your washing machine’s engine from burning
out: 1. Utilise gravity as much as possible; 2. Over
10m+, ensure the extension hose is at least 50mm to
reduce strain on the pump; and 3. Don’t pump uphill
(if you do need to, you’ll have to get a pump built
for this purpose).
If
you include an appropriate length of 100mm ag-pipe
inside each pit, with one end just slightly sticking
out, this means that you can poke your washing
machine hose down inside so that the water
infiltrates sub-surface as regulations rightly
demand (stops kids and pets getting sick from the
pretty nasty pathogens that greywater can contain).
If
you want to utilise your bath and shower water also,
by law you’re supposed to get a plumber in to divert
the water. From here, a more permanent option is to
construct branched drains which evenly distribute
the water around the garden. Detailed design and
installation instructions are available for this
method in Art Ludwig’s book The New Create an
Oasis Using Greywater.
You
can irrigate a 1/8 acre suburban orchard for under
$200, which is pretty good value I reckon compared
to the $10,000-$20,000 approved treatment systems.
When
rainwater harvesting is mentioned, most people think
of tanks straight away. That’s a great start, but
there is a much bigger storage you have available to
you on your land – the soil. (Check out Brad
Lancaster’s fun U-tube video on this site, ‘The muffin tin and the sponge’
for a good intro)
So
when your gutters flow and your tanks are full,
don’t send all that valuable water straight the
drain like so many do. Instead, have a go at
utilising that water in your garden by creating a
system similar to this.
Rural
and semi-rural permaculture systems are often built
with swales incorporated. A swale is
a water harvesting ditch on contour which intercepts
runoff, then fills up and holds onto the water long
enough for it to soak into the soil for the use of
tree crops (You can see plenty of examples of swales
on this website).
Swales
are fantastic, however, in an urban situation not
everyone wants to have a garden that resembles a
motor-cross track, nor gaping wide trenches that
Granny can get lost in. The French-drain design
explained in this article is an alternative, which
has the same benefits of a swale, whilst being
pretty much invisible.
Designing
Just as with swale systems, whenever we are
infiltrating large amounts of water into our soil,
it’s very important to include trees as part of the
design; if not, you risk water logging and quite
possibly salting the landscape.
Don’t
just wack one of these in; you can put a whole
series of them throughout your forest garden for
example. When you’re deciding where they’ll go, it’s
good to be aware that most fruit trees like to drink
and eat at their dripline, so therefore this is
where it makes sense to position your trenches. For
young trees you’ll need to decide where the end
dripline will be and position them there. It’ll take
a while for the young tree’s roots to reach out to
the moisture you’re infiltrating for them, so in the
meantime, you can dig a finger off the side of your
trench to direct water closer to it’s young root
system.
Gravity
is your best friend when playing with water, so
start off by directing your downpipes or tank
overflow to the top corner of your land through some
90mm PVC pipe (even if you think that your land is
flat, there will always be some fall. If not, you’re
either living in the middle of a salt-pan or an
indoor basketball court). From here, work your way
down the hill and position a trench wherever you
have trees and shrubs that can utilise the moisture.
Just make sure that you’re infiltrating water at
least a few metres away from building foundations or
else you can undermine them.
Size and shape
Each trench should be about 50 cm deep. Any more
than that and you’ll be infiltrating the water below
the main feeder and drinker roots of your fruit
trees.
If
your land is relatively flat, you can get quite
creative and make them basically any shape you like.
However, if you are on a slope, you’ll need to make
sure that they are positioned across the slope, that
is, on contour like a swale. Just remember, the
bigger your trenches, the more water it can hold,
and therefore, the more water it can infiltrate.
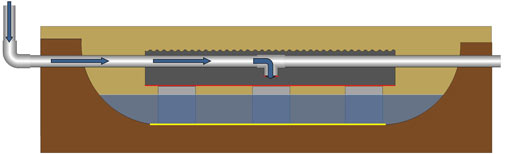
The
construction is quite simple as the illustration
shows:
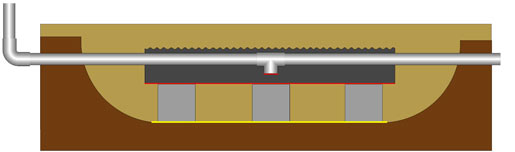
90mm PVC pipe.
Begin with some 90mm PVC pipe heading from your
water source with an open 90mm Tee pointing
downwards at the centre of your trench. The top of
this pipe should be about 10 cm below the
surrounding soil level.
Reln
drain.
Over the top of
the PVC pipe you place an impervious reln drain with
a gap of about 5 cm above the pipe (a reln drain is
a corrugated half-pipe about 40cm in diameter and
comes in 1.5m sections. They’re designed for use in
septic tank leach fields and cost about AUD $15 at
plumbing supply places). The reln drain should be
well supported using old blocks or bricks to prevent
it sinking over time, and to prevent pressure on the
PVC pipe if it’s walked on.
Budgie
wire
(the red line on
the picture). This is placed over the base and ends
of the reln drain and also at the opening of the
tee. This is to prevent the mulch (which the trench
is filled with) from floating up and entering the
pipe.
Old
plastic
(the yellow line
on the picture). This is used to line the base of
the trench, which encourages water to infiltrate
laterally towards the trees’ main drinker roots,
rather than straight down.
Mulch.
The trench should be filled with either coarse mulch
or aggregate. The purpose of the reln drain is to
create an air gap around the pipe, which stops tree
roots from clogging it up (see the front view
below). If you decide on mulch to fill your trench,
it will need to be topped up from time to time, but
will eventually become a lovely big humus sponge. If
you decide on aggregate, you’ll need to line your
trench with Geo-textile matting to stop tree roots
and soil from clogging it up.
So
basically, what happens is the water flows along the
pipe until it comes to your open tee where it has no
choice but to pour out into your trench.
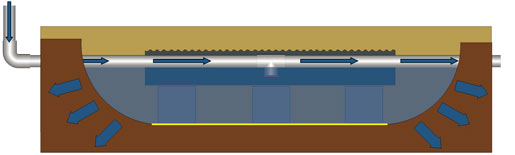
Once
the trench fills up to the height of the tee, the
water will then continue along the pipe until it
gets to your next trench which it will dutifully
fill etc etc.
On
urban properties, a lot of water can run off all
those hard surfaces during a wetter period or during
a large rain event (A note to Victorians: They will
come again one day, I promise), far more than our
gardens can infiltrate. So it’s really important to
be mindful about the possibility of flooding your
neighbour’s or even your own house.
To
avoid this problem (quite possibly very costly),
once you’ve caught and infiltrated all the water you
can/need, you’ll need to divert it back into the
stormwater drains before it rushes onto
buddy-next-door’s place (by law in Oz, you’ll need a
plumber or landscaper to do this job, but before you
do, have a chat with your neighbour cause he might
like to use the runoff himself).
Similarly,
there will be times when your soil is already as wet
as it needs to be and if you send in much more,
you’ll just end up making your soils anaerobic and
you’ll also leach valuable nutrients from your
system. To avoid this, plumb your system so that
during these wetter times you can just send the
water down the drain.
Good luck and happy
drought-proofing!
Cam Wilson, www.forestedgepermaculture.com
For
methods of collecting water from dew, such as air
wells and dew pods, see
|